4. Test Bench Definition Tutorial
Trigger Phase
The trigger phase is the first phase executed in most test benches. It is a test phase which is outside of the test execution, meaning it cannot fail and does not consume test execution time. The trigger phase is added by default by spintop-openhtf. However it was disabled in our first example in the tutorial.
Default Trigger Phase
Let’s start the trigger phase experimentation by removing the trigger phase disable in the test bench main. Replace the main from the Running a First Test Bench tutorial example by the one below and run the bench again.
if __name__ == '__main__':
    plan.run()
The web interface now displays the default trigger phase, asking for a DUT id to start the test.
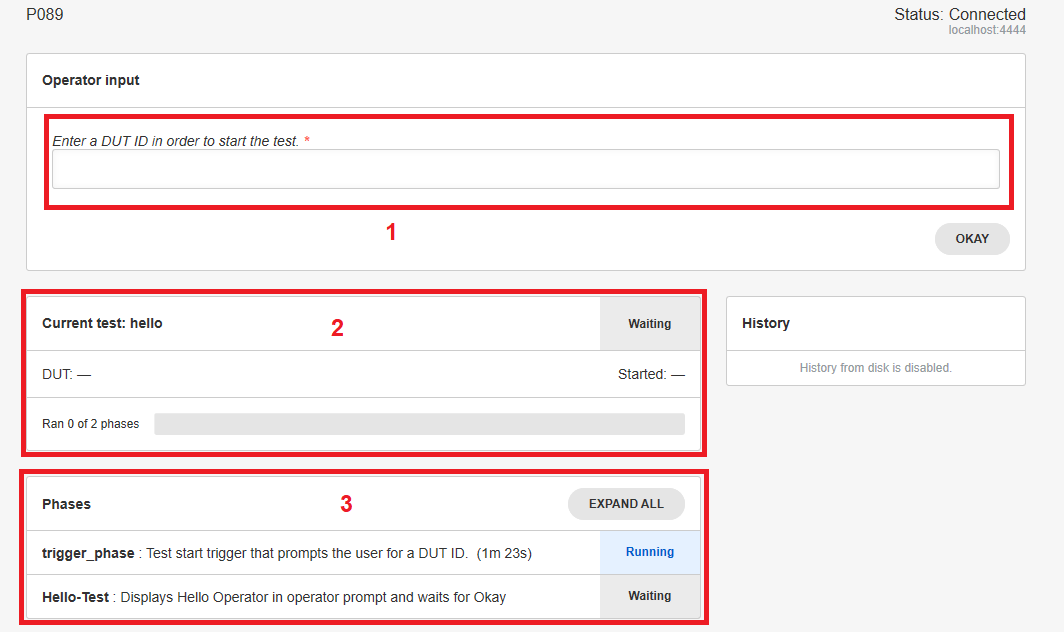
The DUT id is asked for in the operator input dialog.
The current test is displayed as waiting.
The Phases dialog now displays the trigger phase as well as our hello-test phase.
Enter DUT1 as the DUT id and press OK. The test will continue to the hello-test phase and display the Hello Operator! prompt.
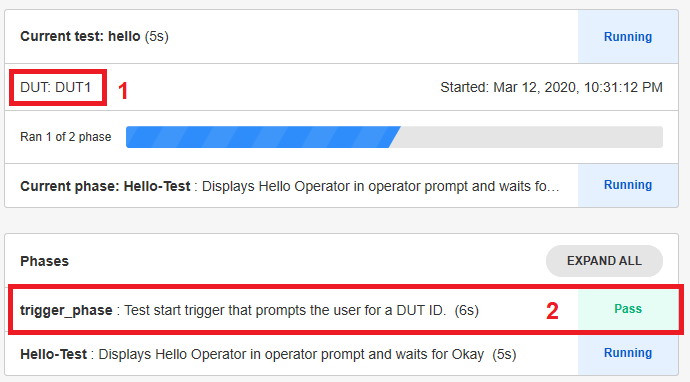
The DUT id is displayed.
The trigger phase is marked as executed and passed.
Custom Trigger Phase
With the custom forms, it is possible to define a custom trigger phase to create a specific dynamic configuration for your test bench.
Let’s first define what our trigger phase will do. The following information will be asked from the operator:
The full operator name from a drop down list
The Device Under Test serial number
The tested product from a drop down list
The form is defined as the following:
FORM_LAYOUT = {
    'schema':{
        'title': "Test configuration",
        'type': "object",
        'required': ["operator, uutid, product"],
        'properties': {
            'operator': {
                'type': "string",
                'title': "Enter the operator name"
            },
            'dutid': {
                'type': "string",
                'title': "Enter the device under test serial number"
            },
            'product': {
                'type': "string",
                'title': "Enter the product name"
            }
        }
    },
    'layout':[
        "operator", "dutid", "product",
    ]
}
To call the form in the trigger phase, define a new test case, but instead of using the plan.testcase decorator, use the plan.trigger one. In the example below, we modified the test case used in the Extracting Data from the Custom Forms Responses tutorial to define a configuration phase to be used as a trigger, using the custom form defined above.
@plan.trigger('Configuration')
@plan.plug(prompts=UserInput)
def trigger(test, prompts):
    """Displays the configuration form"""
    response = prompts.prompt_form(FORM_LAYOUT)
    pprint (response)
Since the phase using the custom form is now the trigger, a new test case must be defined to implement the test bench. A simple sleep test is added for this purpose.
from time import sleep

@plan.testcase('Sleep')
def sleep_test(test):
    """Waits five seconds"""
    sleep(5)
To run the test plan with the new trigger phase, remove the plan.no_trigger() call.
if __name__ == '__main__':
    plan.run()
Now run the new test plan. The test will display the following form:
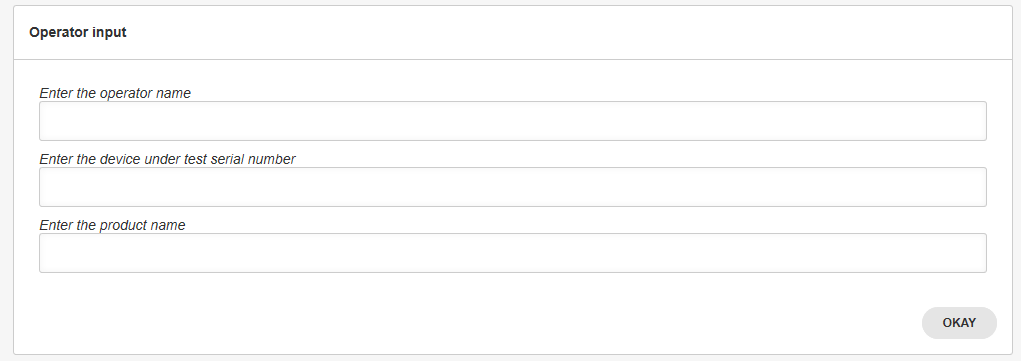
Enter the operator name, the device serial number and the product ID and hit okay. The sleep test will wait 5 seconds and terminate. The status of the two phases can be seen in the web interface.
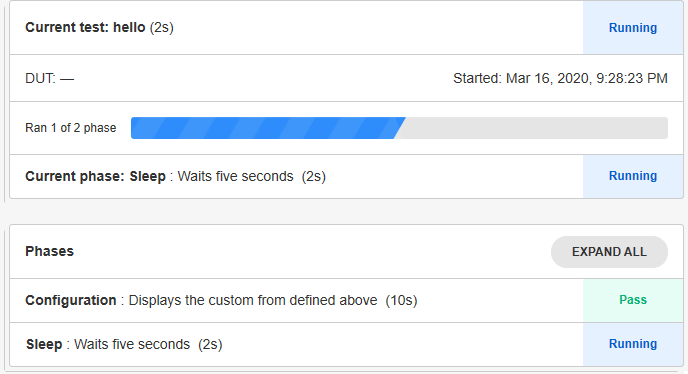
As the test bench executes, the following verbose will be outputed on the command line.
W 01:14:11 test_executor - Start trigger did not set a DUT ID.
W 01:14:16 test_executor - DUT ID is still not set; using default.
This occurs because the trigger phase is designed in part to enter the DUT ID and log it in the test variables. The form has indeed asked for the DUT ID but has not logged it. Add the following line at the end of the trigger phase and rerun the test bench.
response = prompts.prompt_form(FORM_LAYOUT)
test.dut_id = response['dutid']
The missing dut id verbose is gone and the id has been logged in the test variables.
Test Case Declaration
The different test cases are defined and declared one by one in in the test plan. Let’s review the test case declared in the Running a First Test Bench tutorial.
The test case is declared as:
@plan.testcase('Hello-Test')
@plan.plug(prompts=UserInput)
def hello_world(test, prompts):
    prompts.prompt('Hello Operator!')
    test.dut_id = 'hello' # Manually set the DUT Id to same value every test
spintop-openhtf uses the name “test phase” to refer to the different test cases in the test bench.
Logging in the Test Bench
A python logger is available in the test object which is passed in arguments to the test case function. Define a new test case for the logger test and setup the logger to log a test string.
@plan.testcase('Logger Test')
def logger_test(test):
    test.logger.info('This is a logging test string')
Run the test bench to see the new string in the test logs. In the web application logger space, the logged test string can be seen.
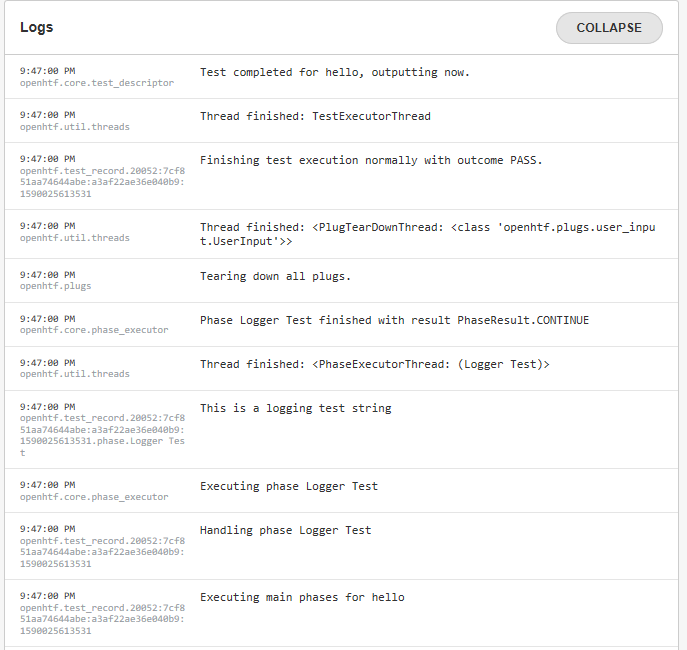
To better explore what is logged in a test run, we have copied below all the log strings of an execution.
9:47:00 PM - openhtf.core.test_descriptor - Test completed for hello, outputting now.
9:47:00 PM - openhtf.util.threads - Thread finished: TestExecutorThread
9:47:00 PM - openhtf.test_record.20052:7cf851aa74644abe:a3af22ae36e040b9:1590025613531 - Finishing test execution normally with outcome PASS.
9:47:00 PM - openhtf.util.threads - Thread finished: <PlugTearDownThread: <class 'openhtf.plugs.user_input.UserInput'>>
9:47:00 PM - openhtf.plugs - Tearing down all plugs.
9:47:00 PM - openhtf.core.phase_executor - Phase Logger Test finished with result PhaseResult.CONTINUE
9:47:00 PM - openhtf.util.threads - Thread finished: <PhaseExecutorThread: (Logger Test)>
9:47:00 PM - openhtf.test_record.20052:7cf851aa74644abe:a3af22ae36e040b9:1590025613531.phase.Logger Test - This is a logging test string
9:47:00 PM - openhtf.core.phase_executor - Executing phase Logger Test
9:47:00 PM - openhtf.test_record.20052:7cf851aa74644abe:a3af22ae36e040b9:1590025613531 - Handling phase Logger Test
9:47:00 PM - openhtf.test_record.20052:7cf851aa74644abe:a3af22ae36e040b9:1590025613531 - Executing main phases for hello
9:47:00 PM - openhtf.test_record.20052:7cf851aa74644abe:a3af22ae36e040b9:1590025613531 - Entering PhaseGroup hello
9:47:00 PM - openhtf.core.phase_executor - Phase trigger_phase finished with result PhaseResult.CONTINUE
9:47:00 PM - openhtf.util.threads - Thread finished: <PhaseExecutorThread: (trigger_phase)>
9:47:00 PM - openhtf.plugs.user_input - Responding to prompt (d6faa8b3bf654f109a8fb6e62c076541): "{'content': {'_input': '1'}, 'option': 'OKAY'}"
9:46:55 PM - openhtf.output.servers.pub_sub - New subscriber from ::1.
9:46:53 PM - openhtf.plugs.user_input - Displaying prompt (d6faa8b3bf654f109a8fb6e62c076541): "{'schema': {'title': 'Generic Input', 'type': 'object', 'required': ['_input'], 'properties': {'_input': {'type': 'string', 'title': 'Enter a DUT ID in order to start the test.'}}}}"
9:46:53 PM - openhtf.core.phase_executor - Executing phase trigger_phase
For each entry is logged
the time of the entry
the logging module
the log string itself
Among the log entries, can be seen the following information:
The phase executor module declaring the start and end of each phase or test cases. In the phase end entry the phase result is declared. Phases and phase results are explained further in this tutorial.
openhtf.core.phase_executor - Executing phase trigger_phase
openhtf.core.phase_executor - Phase trigger_phase finished with result PhaseResult.CONTINUE
The added test string from our test bench
openhtf.test_record.20052:7cf851aa74644abe:a3af22ae36e040b9:1590025613531.phase.Logger Test - This is a logging test string
The information regarding our user input form including the returned dictionary
openhtf.plugs.user_input - Displaying prompt (d6faa8b3bf654f109a8fb6e62c076541): “{‘schema’: {‘title’: ‘Generic Input’, ‘type’: ‘object’, ‘required’: [‘_input’], ‘properties’: {‘_input’: {‘type’: ‘string’, ‘title’: ‘Enter a DUT ID in order to start the test.’}}}}”
The test bench result
openhtf.test_record.20052:7cf851aa74644abe:a3af22ae36e040b9:1590025613531 - Finishing test execution normally with outcome PASS.
Further exploration of the logs will be done as the test flow of the test bench is explained.
Test Flow Management
In the context of a spintop-openhtf test bench, test flow management consists in selecting the test cases to execute dynamically depending on
the input of the operator during the trigger phase,
the results and outcomes of the previous test phases.
A test bench can be implemented for a family of product instead of one test bench per product version. In these test benches, the DUT type selected in the trigger phase will determine which test cases are executed. For example, for a version, all test cases can be run and for another, a test is removed. Test flow management allows the definition of such test benches.
Dynamic Test Flow Management with Phase Outcomes
The outcome and result of a phase can impact the execution of the rest of the test benches. Let’s first explore the concepts of phase outcomes and phase results.
Phase results
The result of a test phase is controlled by the value it returns. The developper can determine through the test logic which result is returned.
It can return None (or no return statement) for the standard CONTINUE. If an uncatched exception occurs during the test, the phase will be marked as ERROR. OpenHTF will infer the outcome based on the test phase result.
PhaseResult.CONTINUE: Causes the framework to process the phase measurement outcomes and execute the next phase.
PhaseResult.FAIL_AND_CONTINUE: Causes the framework to mark the phase with a fail outcome and execute the next phase.
PhaseResult.REPEAT: Causes the framework to execute the same phase again, ignoring the measurement outcomes for this instance.
PhaseResult.SKIP: Causes the framework to ignore the measurement outcomes and execute the next phase.
PhaseResult.STOP: Causes the framework to stop executing, indicating a failure. The next phases will not be executed.
Phase outcomes
The outcome of a test phase can be one of the following values, which is determined by the PhaseResult described above:
PhaseOutcome.PASS: The phase result was CONTINUE and all measurements validators passed.
PhaseOutcome.FAIL: The phase result was CONTINUE and one or more measurements outcome failed, or the phase result was FAIL_AND_CONTINUE or STOP.
PhaseOutcome.SKIP: The phase result was SKIP or REPEAT.
PhaseOutcome.ERROR: An uncatched exception was raised, and that exception is not part of the
failure_exceptionslist. The test will stop in such a case.
Although you should not need to import this enum for test sequencing, you can import it using from openhtf.core.test_record import PhaseOutcome. Usage would be to analyze results.
Phase outcomes are inherited through all levels by the parent phase up to the test plan itself.
Difference between outcome and result
Simply put,
the phase outcome determines if the phase has failed or passed, and is propagated to all parent phases.
the phase result first creates the phase outcome and then dictates the remaining test flow.
The phase results impact on the test flow is discussed and examplified in details below.
Managing the Test Flow Based on Phase Results
The phase results can be used by the test bench developper to manipulate the flow of the test bench based on intermediary results.
PhaseResult.STOP
The PhaseResult.STOP result can be imposed by the developper in the case of the failure of a critical test. Tests are critical when continuing the test after a failure could be dangerous for the unit under test and the test bench. The developper could also decide to terminate the test on a failure when continuing would be a waste of time. The flow management based on phase results allows the termination of the test bench on such a critical phase failure.
PhaseResult.FAIL_AND_CONTINUE
The PhaseResult.FAIL_AND_CONTINUE result is used to mark a phase as failed when no other element of the test would indicate it (criteria or exceptions). The developper uses it as the return code.
As an example, it is decided to return a failure in product “B” is selected in the trigger phase.
from openhtf import PhaseResult

@plan.testcase('Sleep')
def sleep_test(test):
    """Waits five seconds"""
    sleep(5)
    if test.state["product"] == "A":
        return PhaseResult.CONTINUE
    elif test.state["product"] == "B":
        return PhaseResult.FAIL_AND_CONTINUE
PhaseResult.REPEAT
The PhaseResult.REPEAT result can be used to retry non-critical tests. Some tests can be retried until they pass (with a maximum retry number), without endangering the quality of the product. For example a calibration algorithm that converges through multiple tries.
In the case the developper requires a repeat of the test for it to converge to a PASS, the return code is used. The repeat_limit option is used to limit the number of retries. If the PhaseResult.REPEAT is returned once more than the phase’s `repeat_limit*, this will be treated as a PhaseResult.STOP.
As an example, we create a test which generates a random number between 1-10 and declares a PASS if the result is 8 or higher. The test will fail 70% of the time, but will be repeated until it passes, if the PASS appears within 5 retries.
from openhtf import PhaseResult
import random

@plan.testcase('Random', repeat_limit = 5)
def random_test(test):
    """Generate a random number between 1 and 10. If number is 8, 9, or 10 it is a PASS. If not repeat"""
    val = random.randint(1, 10)
    print (val)
    if val >= 8:
        return PhaseResult.CONTINUE
    else:
        return PhaseResult.REPEAT
The following is an excerpt of a log of a 5 retries test
Handling phase Random
Executing phase Random
3
Thread finished: <PhaseExecutorThread: (Random)>
Phase Random finished with result PhaseResult.REPEAT
Executing phase Random
2
Thread finished: <PhaseExecutorThread: (Random)>
Phase Random finished with result PhaseResult.REPEAT
Executing phase Random
3
Thread finished: <PhaseExecutorThread: (Random)>
Phase Random finished with result PhaseResult.REPEAT
Executing phase Random
7
Thread finished: <PhaseExecutorThread: (Random)>
Phase Random finished with result PhaseResult.REPEAT
Executing phase Random
9
Thread finished: <PhaseExecutorThread: (Random)>
Phase Random finished with result PhaseResult.CONTINUE
PhaseResult.SKIP
The PhaseResult.SKIP result can be used by the developper to ignore a phase, depending on what goes on inside. Let’s merge our last two examples, to create a test where, if product “A” is entered, the random test is executed and logged, and if product “B” is entered, the random test is executed but its result is ignored. No repeats are allowed.
from openhtf import PhaseResult
import random
@plan.testcase('Random')
def random_test(test):
    """Generate a random number between 1 and 10.

    If number is 8, 9, or 10 it is a PASS. If not repeat"""
    val = random.randint(1, 10)
    print (val)
    if test.state["product"] == "A":
        if val >= 8:
            return PhaseResult.CONTINUE
        else:
            return PhaseResult.FAIL_AND_CONTINUE
    elif test.state["product"] == "B":
        return PhaseResult.SKIP
The following are two log excerpts. The first one for product “A”, the second for product “B”.
Executing phase Random 2
7
Thread finished: <PhaseExecutorThread: (Random 2)>
Phase Random 2 finished with result PhaseResult.FAIL_AND_CONTINUE
Executing phase Random 2
7
Thread finished: <PhaseExecutorThread: (Random 2)>
Phase Random 2 finished with result PhaseResult.SKIP
Interpreting exceptions as failures
Normally, exceptions are catched by spintop-openhtf which translates them to a PhaseOutcome.ERROR outcome. To identify certain exceptions as a FAIL instead of as an error, you can add failure exceptions to the test plan.
test_plan = TestPlan()
test_plan.failure_exceptions += (Exception,)

@test_plan.testcase('test1')
def my_test(test):
    raise Exception('!!') # Will mark phase as FAIL instead of ERROR.
Test Hierarchy
To build comprehensive test benches it is important to define a test hierarchy. We have already explored the declaration of a test case within a test plan, which creates a 2-level hierarchy. As we have defined our test benches, the test plan inherits the status of the underlying test cases. If a test case fails, the test plan fails. The test bench does not need to remain a 2-level hierarchy. The test plan can be comprised of complex test sequences which in turn are comprised of sub-sequences, testcases and so on.
Test Plan
└─── Sequence 1
│    └─── Sub-sequence 1A
│    │    └─── Testcase 1A-1
│    │    └─── Testcase 1A-2
│    │    └─── Testcase 1A-3
│    └─── Sub-sequence 1B
│         └─── Testcase 1B-1
│         └─── Testcase 1B-2
└─── Sequence 2
     └─── Sub-sequence 2A
          └─── Testcase 2A-1
          └─── Testcase 2A-2
Each level inherits the status of the underlying levels. They are all test phases and their statuses are defined by the phase outcome.
Defining Sequences or PhaseGroups
Spintop-openhtf uses PhaseGroup objects to instanciate test sequences. To define a test sequence within your test plan, simply use the TestSequence module.
from spintop_openhtf import TestPlan, TestSequence

sequence = TestSequence('Sleep Sequence')
To add test cases to the sequence, instead of to the test plan itself, simply use the sequence instead of the test plan in the test case decorator.
@sequence.testcase('Sleep Test 1')
def sleep_test_1(test):
    """Waits five seconds"""
    sleep(5)

@sequence.testcase('Sleep Test 2')
def sleep_test_2(test):
    """Waits ten seconds"""
    sleep(10)
This will create the following hierarchy
Test Plan
└─── Sleep Sequence
     └─── Sleep Test 1
     └─── Sleep Test 2
To execute it, connect the sequence to its parent, append it to the test plan.
plan.append(sequence)
Add the new sequence to your latest test bench and run it.
The stripped down log excerpt below shows the loading of the PhaseGroup defined as the Sleep Sequence, and executes both test cases.
Entering PhaseGroup Sleep Sequence
Executing main phases for Sleep Sequence
Handling phase Sleep Test 1
Executing phase Sleep Test 1
Thread finished: <PhaseExecutorThread: (Sleep Test 1)>
Phase Sleep Test 1 finished with result PhaseResult.CONTINUE
Handling phase Sleep Test 2
Executing phase Sleep Test 2
Thread finished: <PhaseExecutorThread: (Sleep Test 2)>
Phase Sleep Test 2 finished with result PhaseResult.CONTINUE
Adding Levels to the Test Hierarchy
Further levels of hierarchy can be added using the sub_sequence function
sequence = TestSequence('Sleep Sequence')
sub_seq = sequence.sub_sequence('Sleep Sub Sequence 1')
Use the new sub_sequence in the test case declaration to it to the sub_sequence.
sub_seq = sequence.sub_sequence('Sleep Sub Sequence 1')
@sub_seq.testcase('Sleep Test 1A')
def sleep_test_1A(test):
    """Waits five seconds"""
    sleep(5)

@sub_seq.testcase('Sleep Test 1B')
def sleep_test_1B(test):
    """Waits five seconds"""
    sleep(5)

sub_seq = sequence.sub_sequence('Sleep Sub Sequence 2')
@sub_seq.testcase('Sleep Test 2')
def sleep_test_2(test):
    """Waits five seconds"""
    sleep(5)
The above declarations will define the following hierarchy:
test plan
└─── Sleep Sequence
     └─── Sleep Sub Sequence 1
     │    └─── Sleep Test 1A
     │    └─── Sleep Test 1B
     └─── Sleep Sub Sequence 2
          └─── Sleep Test 2
Add the new sub-sequences to your latest test bench and run it.
The stripped down log excerpt below shows the loading of the different PhaseGroup objects defined as the Sleep Sequence and both Sleep Sub Sequences and the exection of all test cases.
Entering PhaseGroup Sleep Sequence
Executing main phases for Sleep Sequence
Entering PhaseGroup Sleep Sub Sequence 1
Executing main phases for Sleep Sub Sequence 1
Handling phase Sleep Test 1A
Executing phase Sleep Test 1A
Thread finished: <PhaseExecutorThread: (Sleep Test 1A)>
Phase Sleep Test 1A finished with result PhaseResult.CONTINUE
Handling phase Sleep Test 1B
Executing phase Sleep Test 1B
Thread finished: <PhaseExecutorThread: (Sleep Test 1B)>
Phase Sleep Test 1B finished with result PhaseResult.CONTINUE
Entering PhaseGroup Sleep Sub Sequence 2
Executing main phases for Sleep Sub Sequence 2
Handling phase Sleep Test 2
Executing phase Sleep Test 2
Thread finished: <PhaseExecutorThread: (Sleep Test 2)>
Phase Sleep Test 2 finished with result PhaseResult.CONTINUE
Further hierarchy levels can be added by creating new sub_sequences from the sub_sequence object.
sub_seq = sequence.sub_sequence('Sleep Sub Sequence 1')
sub_sub_seq = sub_seq.subsequence('Sleep Sub Sequence 1A')
@sub_sub_seq.testcase('Sleep Test 1A-1')
def sleep_test_1A_1(test):
    """Waits five seconds"""
    sleep(5)
And so forth, to define the exact hierarchy needed for your test plan.
Managing the Test Flow Based on the Trigger Phase
As we have seen previously, the trigger phase is used to input dynamic configuration parameters at the beginning of the test bench. This test configuration can be used to manipulate the test flow. For example, a choice of test to execute in the form of a dropdown list or a scanned entry of the product version can lead to a different execution.
The test.state object is used to communicate the information through the test bench. Let’s first define a new variable which will allow the execution of Sleep Test 2 if the product entered in the trigger phase is “A”
def trigger(test, prompts):
    """Displays the configuration form"""
    response = prompts.prompt_form(FORM_LAYOUT)
    test.dut_id = response['dutid']
    test.state["operator"] = response['operator']
    test.state["product"] = response['product']
    if test.state["product"] == "A":
        test.state["run_sleep_2"] = True
    else:
        test.state["run_sleep_2"] = False
    pprint (response)
The run_sleep_2 entry of the test.state dict will determine whether the test is executed. To add the run time test management, redefine the test with the run_if option as seen below.
@sub_seq.testcase('Sleep Test 2', run_if=lambda state: state.get('run_sleep_2', True))
def sleep_test_3(test):
    """Waits five seconds"""
    sleep(5)
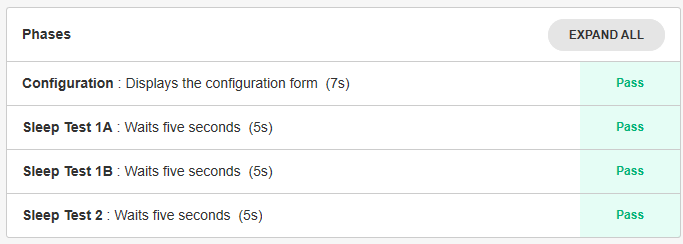
This definition will lead to the test being executed if the run_sleep_2 of the test.state dictionary is set to True, that is if the product was entered as “A”.
Modify your test bench to reflect the above changes and run it again. When prompted enter “A” as the product. Sleep Test 2 is executed.
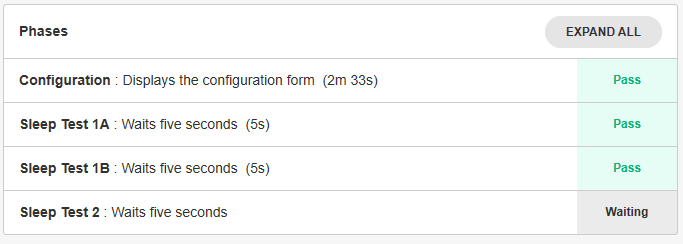
Re-execute it by entering “B” as the product
Using a Set Up and a Teardown or Cleanup Phase
It is a good practice to define a setup and a teardown phase within your sequences.
The setup phase is used to initialize the test environment to execute the test cases in the sequence. Setup failure cancels the execution of the group, including the teardown. Define the setup phase using the setup() function.
The teardown phase is usually used to reset the test environment to a known status and is always executed at the end of a sequence if at least one sequence’s test phases is executed. It is executed even if one of the phase fails and the other intermediary phaes are not. Define the teardown phase using the teardown() function.
Adding a setup and a teardown phase to a sub-sequence
Add a setup and a teardown phase to the Sleep Sub Sequence 1
sub_seq = sequence.sub_sequence('Sleep Sub Sequence 1')

@sub_seq.setup('Sub-sequence Setup')
def sub_setup(test):
    """Says Sub setup."""
    test.logger.info('Sub setup')

@sub_seq.testcase('Sleep Test 1A')
def sleep_test_1A(test):
    """Waits five seconds"""
    sleep(5)

@sub_seq.testcase('Sleep Test 1B')
def sleep_test_1B(test):
    """Waits five seconds"""
    sleep(5)

@sub_seq.teardown('Sub-sequence Cleanup')
def sub_cleanup(test):
    """Says Sub cleanup."""
    test.logger.info('Sub cleanup')
Test Plan
└─── Sleep Sequence
     └─── Sleep Sub Sequence 1
     │    └─── Sub-sequence Setup
     │    └─── Sleep Test 1A
     │    └─── Sleep Test 1B
     │    └─── Sub-sequence Cleanup
     └─── Sleep Sub Sequence 2
          └─── Sleep Test 2
Final teardown
A teardown phase can also be defined for the test plan itself by calling the teardown() function from the @plan decorator. The plan teardown is used to securely shutdown the test bench (for example turning off all power sources, disconnecting from equipement, etc) whether the test has executed completely or has catastrophically
@plan.teardown('cleanup')
def cleanup(test):
    """Says Cleaned up."""
    test.logger.info('Cleaned up.')